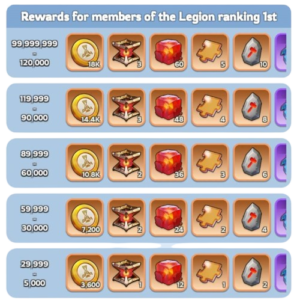
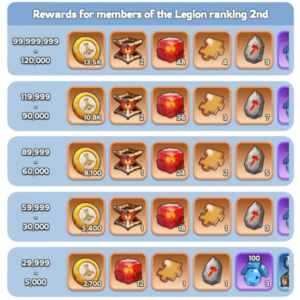
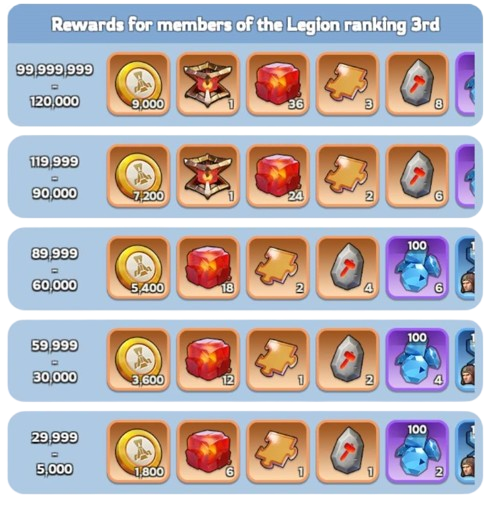
post_image

Canyon Clash

Description

Canyon Clash

The explorers found some ruins in the canyon, with markings of the past that have never been deciphered engraved, seems to be connected with the ruins beneath the Sunfire Castle. Coveting this arcane wisdom, three alliances engage in a fierce conflict to claim sole dominion over it.

Battle Prerequisites

  • Alliance:
  1.  – The top 20 alliances on the Power Leaderboard before the event starts are eligible for the Canyon Clash.
  2.  – The first Legion is unlocked by default. To unlock the second Legion, the alliance must be at least Lv. 6 and have 40 members who have logged into the game this week. Members leaving the alliance will affect the count.
  3.  – The total number of combatants and substitutes in a Legion must be at least 15 to participate in matchmaking. This is calculated separately for each Legion.
  • Personal:
  1.  – Members who joined prior to registration with at least a Lv. 16 Furnace are eligible for the ” Canyon Clash.
  2.  – Members who have been offline for 5 days** or more cannot be dispatched. This does not apply to those who have already been dispatched.

Rules

  1.  – The schedule of [Canyon Clash] is as follows:  Voting Monday & Tuesday – Registration Wednesday and Thursday – Matchmaking Friday – Battle SATURDAY
  2.  – During the Registration Phase, registration needs to be done and confirmed by alliance members with R4 or higher ranks. Alliance leaders and members with R4 or higher ranks can select up to 30 combatants and 10 substitutes on the Deployment page.
  3.  – Each alliance can send up to 2 legions to join different battlefields.
  4.  – 3 alliances will participate in cross-state matchmaking and be engaged in a three-way battle in Lost Canyon.
  5.  – Each Chief can form 3 squads to enter the battlefield.
  6.  – Canyon Clash is divided into four stages:
  • 1 – Preparations (3 minutes);
  • 2 – Seize & Conquer (17 minutes);
  • 3 – Fortress Occupation (20 minutes);
  • 4 – Citadel Onslaught (20 minutes).

The alliance with the highest points at the end of the battle will be the winner.

7. – Members cannot leave alliances after entering the battlefield.

Battle Rules

  1. – After entering [Lost Canyon], the battlefield of [Canyon Clash] will be opened for 1 hour, and the legions of all three alliances will garrison their troops at the Bastions of their respective alliances. To occupy a building, you need to tap on the target building and deploy your squad there. Occupying nearby buildings and fighting for neutral buildings are the key to gaining points and achieving victory.
  2.  – It costs fuel to deploy, activate, conscript, advance, retreat, and instantly revive your troops. You will continuously acquire fuel automatically as time passes. Being appointed as a Guardian will boost your fuel acquisition rate. Members ranked R4 and above can appoint Guardians. Chiefs garrisoned in buildings can also appoint themselves as the Guardian.
  3.  – When troops arrive at a building where a battle is ongoing, they will have to wait for their turn to battle according to the order of arrival. Troops cannot march while waiting but can advance or retreat when there are 5 friendly squads in the queue.
  4.  – The battles will be 1V1 and in the form of simultaneous exhibition. The battles only take place inside buildings and at fixed times. Winning squads will be moved back to the end of the queue, and defeated squads will revive at their Bastions when the countdown ends. You can also use fuel to instantly revive your squads.
  5.  – The legion that performs the final strike that defeats the last defender will occupy the building.
  6.  – Leaving the battlefield during the event will introduce a 12-minute cooldown for re-entry.
  7.  – Except For March Speed and Deployment Capacity bonuses, other bonuses are effective on the battlefield.

Building Details

  • Personal Merits Rewards

    The rewards that are issued to Legionnaires of Legion 1 and 2 based on the legions’ Point Rankings. In the event of an auto-advance, all combatants and substitutes of the legion will receive Auto-advance Personal Rewards (same as the highest-tier reward For the legion ranking No. 2).

    Alliance Ranking Rewards

    [Canyon Clash] Alliance Ranking Rewards will be issued based on Legion 1’s Point Ranking at the tally of its battlefield. If an alliance is granted auto-advance, then all its members will automatically be issued rewards for a No. 1 alliance.

  • Rewards

    Rewards calculated and distributed for Legion 1 and 2, will be distributed based on individual point rankings. You must have at least 10,000 Personal Merits to be eligible.

Informations:

1: The battle is divided into three stages. In Stage 1, you need to occupy as many neutral buildings as possible and seize control of enemy buildings. The points gained from occupying buildings will determine the winner.

2: In Stage 2, the Fight For Fortresses will begin. As these Fortresses are positioned along key routes, it is crucial to occupy them if you want to take control of the battle.

 3: Frozen Citadel in the middle of the canyon will open in Stage 3. It is the ultimate target for all as its ownership will significantly impact the outcome of the battle. Besides granting points, Frozen Citadel also provides abundant bonus points for its occupier during the Tally Stage. If your team is falling behind, occupying the Frozen Citadel can even help you turn the tide and eventually win the battle!

4: A competent tactician understands the importance of using fuel wisely. It costs fuel to move, conscript, advance, retreat, and revive your troops on the battlefield. You will continuously acquire fuel automatically as time passes. Being appointed as a Guardian will boost your fuel acquisition rate.

5: Different types of defenders of varying sizes are garrisoned at different buildings. The defenders will not leave their buildings. Instead, they will revive some time after they are defeated. Before a building is occupied, the defenders are hostile to all participating Chiefs. After the building is occupied, the defenders will serve the occupier.

6: The battle sequence within a building is determined by the order in which the squads arrive. At the end of each battle, the winning squad will be moved to the end of the queue, whereas the defeated squad will be eliminated and can be revived at the Bastion.

7: If a friendly squad is engaging in a battle in a building with a total of 5 squads queueing for attack or defend, you can spend Gems to use Battle Speedups to reduce the battle time.

8: When there are 5 squads on the queue, you can use fuel to make your squad advance and attack nearby enemy buildings, provided that the building is adjacent to friendly buildings. If you choose to retreat, the squad will retreat to an adjacent friendly building with some losses.

9: When your squad is not engaged in a battle, conscription is available in certain buildings at the cost of fuel. You can also dismiss them and have it revived at the Bastion.

  • Canyon Shop

𝗖𝗮𝗻𝘆𝗼𝗻 𝗖𝗹𝗮𝘀𝗵 𝗧𝗶𝗽𝘀 Fuel is the most important resource in Canyon Clash. Moving, conscripting, advancing, retreating, and instantly reviving troops for your Marches all require fuel, which can be naturally restored over time. Being assigned as a guardian can also increase the efficiency of obtaining fuel.It’s important to monitor the fuel recovery rate; otherwise, you may find yourself completely depleted of fuel halfway through the game and unable to move.

  • Tip – Always assess the situation by checking if enough allies are present in strategic locations (In buildings or on the way), eliminating the risk of possible empty lanes.
  • Tip – If the opposing side is overwhelming, don’t hesitate to seek assistance from your alliance. Resist the urge to instant revive troops with fuel right after succumbs.
  • Tip – Longer routes often require more time and fuel to travel, occupying buildings in advance by taking shorter routes can give you an advantage, making time management crucial.

These meticulous methods not only helps conserve your fuel but also enables the strategic deployment of squads that launches you into key buildings at the start of stage 2 and the central buildings in stage 3.

Canyon Clash will finally be available tomorrow, Molly is as excited as you are! Here are more useful tips for you!

  • Tip – The battlefield for Canyon Clash is huge, so it’s better to split up into different fighting groups for a smoother start to the battle.
  • Tip 5- Choose your most capable and strategically minded chief to lead the battle, and point your strongest spear in the right direction! Set up a voice chat beforehand for better communication, as typing may not be fast enough during intense firefights. Don’t forget to use your alliance labels to let your allies know what you’re up to!
  • Tip – We mentioned the importance of fuel in the previous tip! Make sure that you have enough R4/R5 members in the battle to be able to appoint Guardians in time. Don’t forget that you can appoint yourself as the guardian of the building where your squad is garrisoned, but keep in mind that each chief can only be the guardian of one building. There is also a quick access button in the bottom right corner for R4/R5 members to quickly view guardian assignments.

Here another tips

• Block the Key Area, so enemy can’t move Q&A

  1. Can I occupy one space at a time?!
  2. Do they need to be occupied sequentially or can they just jump to wherever they want?
  3. And if we only defend the front line, they can’t get into our camp?
  4. When should we use buff before to register or battle time?

Answer

  1. You can Occupy 3 space since you had 3 march
  2. Wherever they want as long the building adjacent
  3. Yes they can’t
  4. Use buff when battle start


For the confused ones, this is a TLDR of stuffs:

  • So the gist here is to push only when the situation is good, otherwise just hold down a chokepoint.
  • Also, if your squad can deal with counter raids, then relegate the others for raiding more buildings. Otherwise try to reinforce the building that’s being attacked.
  • If you can hit fast and hit hard, ask to be a Guardian. If not, then let someone else be the Guardian, you just support them.
  • Try to save up fuel. Be defensive when the fuel reserves are low. Always reinforce when you have the chance, don’t travel over long distances unless it’s very important (reinforcing a possible raiding spot or helping an ally in need for example). And only instantly revive if it’s urgent.
  • The most important buildings are keeps (fortresses) and ports/gates. Mainly because keeps provide a lot of points and a strategic spot for raiding, while ports/gates connect to other islands and The Citadel, which is the main goal of the map.
  • Don’t focus on one spot, try to spread your troops evenly across both sides. Otherwise the other teams might try to push through your area while your whole squad is stacked in one building.
  • Once the Citadel is open, don’t try to gain more territories. Send your strongest army to the Citadel, and use the other two for defending important locations from being raided (i.e ports/gates and Keeps). Only raid to reclaim lost territory, don’t try to expand unless it’s possible. Also pay attention to your troops at the Citadel, try to keep them alive for as long as possible with teammates.
  • Last but not least, communication and teamwork. Regardless of whether you have 14 players or 30, teamwork and communication is important. While sending troops, observe the surroundings. Ping important buildings. Call out raids and counter raids. Ask for help if needed. Give reinforcements to protect a building from being raided. Discuss about what to do and who should be the Guardian.


And the most thing of all, is to never, ever, go solo. You will be kicked a lot (and die a lot) if you don’t attack as a team. Even the mightiest legion in the world will crumble under the sheer weight of five peasant armies, regardless of conditions.
Oh, theoretically speaking you can try to conquer the ports connecting to the Citadel for yourself, then only sending in one squad to wipe the NPC troops inside.
This will allow the rest to focus on the ports surrounding it and the one connecting their island.
But you must have an ironclad defense, because your phalanx will be constantly hammered by two opposing sides at once.


Videos
Personaggio del gioco

Tips from Greg

Play the Game


Our socials:


Contributors


flodu
Edited 9 times

Outside Contributors

exorcistCreate the guide
Kingvideo and tips
[S7] Flrognertips

You cannot copy content of this page